Introduction
In my previous two blogs, we have discussed how to display generate and display various barcodes on the web page. In this blog, we are going to demonstrate how to Generate QR Code in the WPF application.
Getting Started
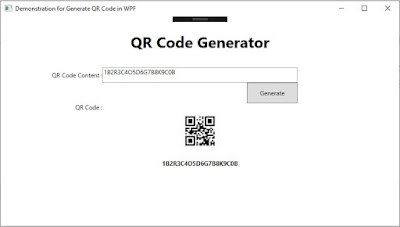
Here in the demonstration Generate QR Code in WPF, will generate QR code using third party library as there is not inbuilt library provided by Microsoft to generate QR code and will display in WPF image control, In the below, we will see the steps to display QR Code.
Here are the steps to generate QR code and let's follow the steps to complete demonstrations.
Demonstration:- Generate QR Code
- Open visual studio, go to file manu=>New and clieck on Projct.
- The New Project window will be appear, Select 'WPF Application' projct template and name the project as GenerateQRCode. Then click on 'OK' button.
- Another window will be appear, just click on 'OK' buttone.
- Go to Solution Explorer, right click on your project then click on 'Manage NuGet Packages'.
- The 'Manage NuGet Packages' window will appear, click on Browse and search for ZXing.
- List of packages will be list out in the list.
- Select the 'ZXing.Net' and install it.
- Add reference of System.Drawing library to the project.
- Then go to the Solution and open, right click on MainWindow and click on 'View Designer'.
- The MainWondow.xaml file will be open there you may find grid control, replace the grid control wth below codes.
- Your Main window should look like below Image
- Again go to Solution Explorer => Right click on the MainWondow and click on View Code.
- Copy the below code which contains function to convert text to QR Code and past it inside MainWidnow class below the controcture of the class.
- Now your are done and run the project.
 |
| Generate QR Code in WPF |
  <Grid>
     <Grid.ColumnDefinitions>
       <ColumnDefinition Width="200"/>
       <ColumnDefinition Width="*"/>
       <ColumnDefinition Width="200"/>
     </Grid.ColumnDefinitions>
     <Grid.RowDefinitions>
       <RowDefinition Height="100"/>
       <RowDefinition Height="30"/>
       <RowDefinition Height="40"/>
       <RowDefinition Height="200"/>
       <RowDefinition Height="*"/>
     </Grid.RowDefinitions>
     <TextBlock Text="QR Code Generator" Grid.Column="1" HorizontalAlignment="Center" VerticalAlignment="Center" FontWeight="Bold" FontSize="30"/>
     <TextBlock Text="QR Code Content :" Grid.Row="1" HorizontalAlignment="Right" VerticalAlignment="Center"/>
     <TextBox Grid.Column="1" Grid.Row="1" Name="txtbarcodecontent"/>
     <Button Content="Generate" Name="btnConvert" Grid.Row="2" Grid.Column="1" HorizontalAlignment="Right" Width="100" Click="BtnConvert_Click"/>
     <TextBlock Text="QR Code :" Grid.Row="3" HorizontalAlignment="Right" VerticalAlignment="Top"/>
     <StackPanel Grid.Row="3" Grid.Column="1" Orientation="Vertical">
       <Image Name="imgbarcode"/>
       <TextBlock Name="tbkbarcodecontent" FontWeight="Bold" HorizontalAlignment="Center"/>
     </StackPanel>
   </Grid>
XAML Codes for Main Window
 |
| Generate QR Code in WPF |
 private void BtnConvert_Click(object sender, RoutedEventArgs e)
     {
       try
       {
           System.Drawing.Image img = null;
           BitmapImage bimg = new BitmapImage();
           using (var ms = new MemoryStream())
           {
             BarcodeWriter writer;
             writer = new ZXing.BarcodeWriter() { Format = BarcodeFormat.QR_CODE };
             writer.Options.Height = 80;
             writer.Options.Width = 280;
             writer.Options.PureBarcode = true;
             img = writer.Write(this.txtbarcodecontent.Text);
             img.Save(ms, System.Drawing.Imaging.ImageFormat.Jpeg);
             ms.Position = 0;
             bimg.BeginInit();
             bimg.CreateOptions = BitmapCreateOptions.PreservePixelFormat;
             bimg.CacheOption = BitmapCacheOption.OnLoad;
             bimg.UriSource = null;
             bimg.StreamSource = ms;
             bimg.EndInit();
             this.imgbarcode.Source = bimg;// return File(ms.ToArray(), "image/jpeg");
             this.tbkbarcodecontent.Text = this.txtbarcodecontent.Text;
         }
       }
       catch (Exception ex)
       {
         MessageBox.Show(ex.Message);
       }
     }
C# Codes for Main Window
Related Articles
Summary
In this blog, we demonstrated how to generate QR code in WPF Application, Home you enjoyed it.
Thanks

Comments
Post a Comment